Showing posts with label canvas removal. Show all posts
Showing posts with label canvas removal. Show all posts
Friday, April 6, 2012
Almost Done Sanding Steam Trunk
I'm almost done sanding. Just cleaning up the edges. I should have this part of the project completed sometime next week. I'll post some pictures soon.
Saturday, March 17, 2012
Still Sanding
I'm still sanding this thing. I took a nice break, and just got back to sanding the other day. I should finally be done with the sanding by next week hopefully. I now officially hate sanding. Anyway once that's done I'll be on to funner parts of the project. Check back soon for updates.
Tuesday, January 10, 2012
Remove Canvas Edging Using A Dremel
I got this great Dremel Tool from my cousin for my birthday. I've used one of these before and knew this would be the perfect tool for this job. For those of you who have never heard of a Dremel tool, it's like a small drill with all kinds of attachments. There is a steel brush attachment which I'm using for the steam trunk project, and an assortment of other attachments like an engraving tip, polishing tip, sanding tips, and all kinds of other cool attachments that have a wide range of uses. If you don't have one of these I strongly suggest making the investment. The basic one runs about $40.00 U.S.D. and comes with a bunch of starter tips including the wire brush tip.
So I had all this edge work to do along the leather trim and locking mechanisms of the trunk. I used the wire brush tip to get as close to the edges as possible. The Dremel tool has power settings ranging from 1 - 10, I kept the power setting around 5-6. This was just enough to strip away the paint, filler, and canvas without severely gouging the wood. After stripping the canvas and paint down to almost the glue, I took a medium grade sand paper and sanded with the grain of the wood to repair any deep marks the Dremel tool may have left. I then alternated several times between Dremel tool, and sandpaper till the edges were close to complete. When using this attachment for this task I strongly suggest using a very light touch, stay patient, take your time, and use a medium setting between 5 and 6.
This process took me about 4 hours which I did in three sittings. Two one hour sessions, and one two hour session.
My hand slipped once and the power setting shot up to 10 and put a small gouge in one of the leather strap holders on the trunk . Besides that one mistake I think it came out pretty good.
On a positive note all that wood filler that I was so worried about turned out to be a small hairline crack going across the entire trunk, and a nice 1 inch gouge near the side. I don't think this is going to be too problematic and should be fairly easy to hide using a darker stain. I have no clue why some asshat would use half a can of wood filler to fill a 1 inch crack, but I'm happy it wasn't as bad as I thought it was.
Project time for this post : 4 hours
Total time spent on project so far : 23 hours 45 minutes
Total project cost so far : $22.62 USD
I have no affiliation with Dremel, and this review of their product is for informational purposes only. This seems to be a good product for this task. This is not a paid endorsement, and this review simply reflects the opinion of the blogger who hopes his readers may find this product review useful and informative for the above mentioned task.
 |
| This is the Dremel 3000. Great for doing edge work on the steam trunk. |
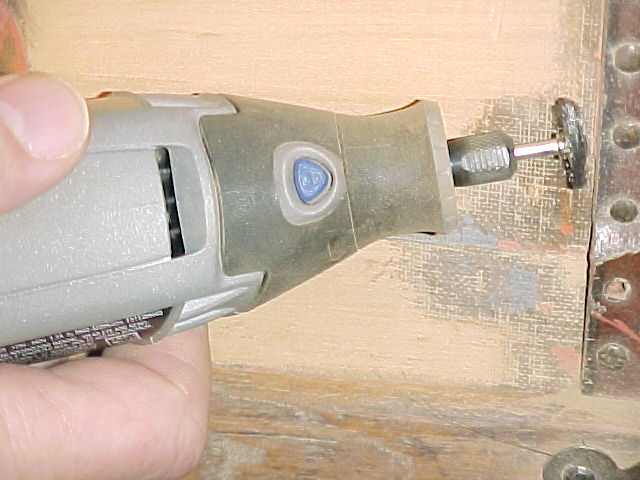 | |
| Using the wire brush tip on the trunk edging, power setting between 5 or 6. |
 |
| Trunk latches stripped of canvas. I still want to get a little closer, I think I have a Dremel tip for that. |
On a positive note all that wood filler that I was so worried about turned out to be a small hairline crack going across the entire trunk, and a nice 1 inch gouge near the side. I don't think this is going to be too problematic and should be fairly easy to hide using a darker stain. I have no clue why some asshat would use half a can of wood filler to fill a 1 inch crack, but I'm happy it wasn't as bad as I thought it was.
 |
| The wood filler debacle doesn't seem to be as bad as I thought it was. |
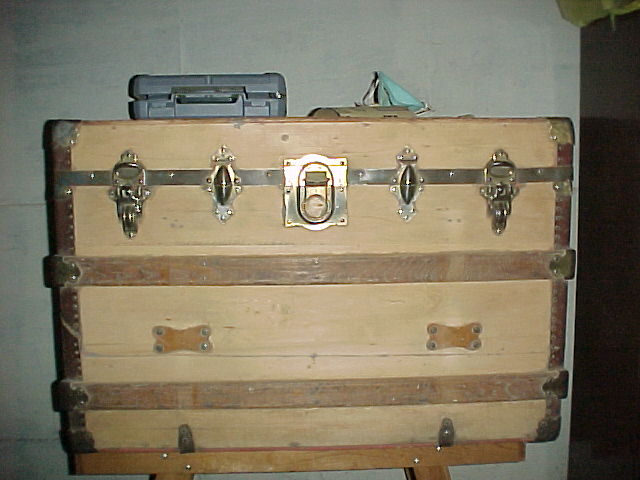 | ||
| The steam trunk front, canvas removed, wood filler close to gone. This projects starting to look better. |
Total time spent on project so far : 23 hours 45 minutes
Total project cost so far : $22.62 USD
I have no affiliation with Dremel, and this review of their product is for informational purposes only. This seems to be a good product for this task. This is not a paid endorsement, and this review simply reflects the opinion of the blogger who hopes his readers may find this product review useful and informative for the above mentioned task.
Wednesday, December 14, 2011
The Sanding Tutorial
I got most of the paint and canvas off the steam trunk with the paint scraper, this will help make it a little bit easier when it comes time to sand our project. In order to avoid gouging the wood with the paint scraper I left the really stubborn canvas and paint to be sanded off later.
I'm not going to go into great detail here. Sanding wood really isn't rocket science. Simply roll up your sleeves and start sanding. The biggest tip I can give you is to always try and sand with the grain of the wood. This really is the most important part, SAND WITH THE GRAIN OF THE WOOD! Bold,capital letters, italics, exclamation mark ! If you sand against the grain, you will see the scratches when you try and stain your finished product. Tip number 2 , use a sanding block whenever possible. This gives you a nice even sanded surface and will help avoid putting grooves or waves in the finished product.
With that said, this is how I attacked this part of the project.
I purchased a sanding sponge from the hardware store. I went with a coarse grade sponge. I used the course sponge to get the areas that had a lot of leftover canvas, paint, and glue. Once the sponge lost its coarseness I wrapped it with a medium grade sandpaper and used the sponge as my sanding block.You could also get a small block of wood and use that instead of the sanding sponge.
Now sand the entire trunk down with the medium grade sand paper wrapped around the sanding sponge. Take off all the leftover canvas, paint and glue. Along the edges and by the locking mechanisms, and latches is the only place I went against the grain when needed. Sand as close to the mechanisms as possible, and when the canvas, glue and paint is removed then take your time and sand with the grain to remove any cross scratching you may have created. This is the most important part, anytime you sand against the grain, sand equally with the grain to remove the scratching.
Finally, before you stain the trunk, you want to sand the entire trunk again with a fine sand paper, and then repeat the entire process again with an extra fine sandpaper. Paying special attention to any areas you may have sanded against the grain and any gouges that may have been created by the paint scraper.
Take your time, be patient, and the extra effort should be rewarding in the finished product.
I spent an additional $9.98 on sanding sponge and sand paper. I'm sure I will be buying more sand paper in the near future. I was short on cash the day I purchased this stuff, so I only bought what I absolutely needed. I still have to buy the fine and extra fine sand paper for finishing. I spent an additional 3.5 hours sanding the front, and will be sanding away throughout the week to try and finish this part of the project up.
Project time for this post : 3 hours 30 minutes
Total time spent on project so far : 19 hours 45 minutes
Total project cost so far : $22.62 USD
Sunday, December 11, 2011
Sunday Update On Sunday
Finally a Sunday update posted on Sunday! As usual the holidays are making things a bit hectic, yet I have found time to make some progress on this antique steam trunk. I started sanding the wood and getting the rest of the canvas and paint removed from the steam trunk panels. It really is starting to look better already.
I put in about 3.5 hours this week sanding and that was only the front of the trunk. This week I'll post a tutorial on how I sanded the steam trunk panels. Unfortunately I ran into a bit of bad luck. It seems at one time this steam trunk was severely damaged. There is a crack going right across the front and some severe damage to the middle panel on the left hand side. I circled the damage in the pictures below. Whoever fixed the trunk panel originally used a very ugly black wood filler, I guess this explains the hideous pink paint. However, as I sand the panel it seems they used an excessive amount of wood filler and for the most part this isn't as bad as it seems. What to do about this is another question all together.
I'm going to keep sanding away at it and see if I can make this wood filler as inconspicuous as possible. Then maybe try and cover it with a dark stain. This will help keep the rustic look I'm trying for. If that doesn't work I may try to replace the panel or cover it with some kind of mural on just the center panel. I'm hoping the dark stain solution will work. Here are the pictures.
So this coming week, time permitting , I am going to try and post a sanding tutorial, remove the inside trunk lining, and remove the damaged trunk handles from the sides of the steam trunk. I'll also try and get all the tutorials posted in the blog as I make progress.
I put in about 3.5 hours this week sanding and that was only the front of the trunk. This week I'll post a tutorial on how I sanded the steam trunk panels. Unfortunately I ran into a bit of bad luck. It seems at one time this steam trunk was severely damaged. There is a crack going right across the front and some severe damage to the middle panel on the left hand side. I circled the damage in the pictures below. Whoever fixed the trunk panel originally used a very ugly black wood filler, I guess this explains the hideous pink paint. However, as I sand the panel it seems they used an excessive amount of wood filler and for the most part this isn't as bad as it seems. What to do about this is another question all together.
I'm going to keep sanding away at it and see if I can make this wood filler as inconspicuous as possible. Then maybe try and cover it with a dark stain. This will help keep the rustic look I'm trying for. If that doesn't work I may try to replace the panel or cover it with some kind of mural on just the center panel. I'm hoping the dark stain solution will work. Here are the pictures.
 | ||
| Most of the canvas and paint stripped from the steam trunk. Next step sand off the excess glue, canvas and left over paint from the steam trunk panels. |
 |
| After sanding with most of the paint and canvas completely removed.The purple circle highlights the damage to the center panel, most of the black is wood filler. The black line running between the two trunk straps is also filler. This poses a small problem. |
Monday, December 5, 2011
Canvas And Paint Stripped Trunk
I finally got most of the paint and canvas stripped from the trunk. I didn't post a Sunday update this week because there was nothing to update. For the most part nothing got done on the trunk till this morning. I woke up this morning more than a little upset that a whole week had passed and there was no progress to report in the blog. That being my motivation, I decided to spend most of my afternoon stripping trunk canvas.
It's not that I'm being lazy here, but with the holidays approaching things have been a bit hectic. My family has a small retail business, so the holidays are always hectic for everyone. I try to help out with the family business and this sometimes gets in the way of my personal life. I'll do my best over the next few weeks to fit in some trunk restoration time and post the results here. Please be patient.
With that said, I spent about 4 hours stripping paint and canvas on the trunk this afternoon. I left two of the side panels because I'm going to be removing the handles in the next couple days. I figure once the handles are off it will be easier to strip the canvas on the sides. I also left two small panels on the back because I'm not sure if I'm going to paint the hinges on the back of the trunk lid. If I do paint the hinges I think it might be a good idea to leave the canvas on there to protect the wood, but then I might chip the fresh paint when I remove the canvas, so I'm not sure about that right now.
Anyway, here are the pictures of the trunk with most of the canvas stripped off. The scraper put a few small gouges in the trunk wood and I didn't want to gouge the wood anymore so I thought I would try stripping the remainder of the canvas with a medium course sandpaper and then go over it again with a fine sandpaper. The few small gouges should be easy enough to sand out.
I'm going to start shopping around for some trunk parts. If I can't find handles I like, I'm going to make them myself from some good strong leather.
Project timd for this post : 4 hours 15 minutes
Total time spent on project so far : 16 hours 15 minutes
Total project cost so far : $12.64 USD
It's not that I'm being lazy here, but with the holidays approaching things have been a bit hectic. My family has a small retail business, so the holidays are always hectic for everyone. I try to help out with the family business and this sometimes gets in the way of my personal life. I'll do my best over the next few weeks to fit in some trunk restoration time and post the results here. Please be patient.
With that said, I spent about 4 hours stripping paint and canvas on the trunk this afternoon. I left two of the side panels because I'm going to be removing the handles in the next couple days. I figure once the handles are off it will be easier to strip the canvas on the sides. I also left two small panels on the back because I'm not sure if I'm going to paint the hinges on the back of the trunk lid. If I do paint the hinges I think it might be a good idea to leave the canvas on there to protect the wood, but then I might chip the fresh paint when I remove the canvas, so I'm not sure about that right now.
Anyway, here are the pictures of the trunk with most of the canvas stripped off. The scraper put a few small gouges in the trunk wood and I didn't want to gouge the wood anymore so I thought I would try stripping the remainder of the canvas with a medium course sandpaper and then go over it again with a fine sandpaper. The few small gouges should be easy enough to sand out.
 |
| Most of the canvas and paint stripped from the trunk. I will go over this with a medium course sandpaper and then a fine course sandpaper. I'll post the results and instructions for that when I start that process. |
 |
| I left the canvas where the hinges are. I'm not sure whether I'm going to paint the hinges first and remove the paint later or remove the paint and canvas and then paint the hinges. I'll decide on this shortly. |
 |
| I received the trunk with this broken handle. I didn't remove the canvas from this panel because I felt it would be easier to do once the handles are removed. The other side is the same way. |
Project timd for this post : 4 hours 15 minutes
Total time spent on project so far : 16 hours 15 minutes
Total project cost so far : $12.64 USD
Monday, November 21, 2011
Stripping The Trunk Canvas
Finally, it's time to remove that hideous pink painted canvas. I started this the other day but didn't have anyone to take pictures, so today I will post a description of how to go about removing the canvas from your trunk restore project.
First I took a razor knife and ran it around the edges of each panel. I tried to slide the razor knife under the trim of the steam trunk without cutting into the trim itself. I used a cheap razor knife I purchased from the dollar store and it seemed to work fine. You could probably use a sharp knife for this but I like the flex of the razor knife. Being flexible, it helped to get into the tight spaces. When using a razor knife try to make sure your other hand is behind the blade, and try to cut away from you so you don't have an accident. Unlike the picture below, I like to live dangerously. I suppose once I take a trip to the emergency room that will cure me of this nasty habit.
After you run the razor knife around the edges of the steam trunk, take a paint scraper and start pulling up the canvas from the trunk. Some of it will come off very easily, other pieces will be much more difficult. Try not to gouge the wood while you do this, and always try and scrape with the grain of the wood.
The bottom panel came up pretty easily but it looks like there may have been some water damage at one time. This helped to loosen the ugly pink painted canvas. The center panel of the trunk was a little more difficult to remove.
I took a larger putty knife and tried to scrape off the more stubborn canvas. I plan on stripping most of the canvas off with the putty knife, the little bit that's left I'll try and remove with a fine sand paper. When I get to that point I'll post the pictures and add them to this tutorial.
This is how far I got after 1 hour and 45 minutes of scrapping. I'll be doing this throughout the week and post some pix of the end result when the paint and canvas are completely removed.
I'll add the 1 hour 45 minutes it took to do this to the overall project time and also add 1 dollar to the project cost for the razor knife I purchased. I now have 12 hours and 12 dollars and some change invested into this project.
Project time for this post : 1 hour 45 minutes
Total time spent on project so far : 12 hours
Total project cost so far : $12.64 USD
For some other tips on removing the canvas and paint from a steam trunk, click on the paint removal and canvas removal tags at the bottom of the post.
First I took a razor knife and ran it around the edges of each panel. I tried to slide the razor knife under the trim of the steam trunk without cutting into the trim itself. I used a cheap razor knife I purchased from the dollar store and it seemed to work fine. You could probably use a sharp knife for this but I like the flex of the razor knife. Being flexible, it helped to get into the tight spaces. When using a razor knife try to make sure your other hand is behind the blade, and try to cut away from you so you don't have an accident. Unlike the picture below, I like to live dangerously. I suppose once I take a trip to the emergency room that will cure me of this nasty habit.
 | |||||||
| Slide the razor knife under the edges of the trunk trim. |
 |
| Try to lift the edges of the canvas and loosen it up a bit. |
 |
| Going with the grain of the wood start removing the canvas. |
The bottom panel came up pretty easily but it looks like there may have been some water damage at one time. This helped to loosen the ugly pink painted canvas. The center panel of the trunk was a little more difficult to remove.
 |
| Take a putty knife or paint scraper to the more stubborn parts. Remember to scrape with the grain of the wood, and try be extra careful not to gouge the wood with your scraper |
I took a larger putty knife and tried to scrape off the more stubborn canvas. I plan on stripping most of the canvas off with the putty knife, the little bit that's left I'll try and remove with a fine sand paper. When I get to that point I'll post the pictures and add them to this tutorial.
 |
| This is how far I got after 1 hour and 45 minutes. I did get all the bottom panels all the way around. |
I'll add the 1 hour 45 minutes it took to do this to the overall project time and also add 1 dollar to the project cost for the razor knife I purchased. I now have 12 hours and 12 dollars and some change invested into this project.
Project time for this post : 1 hour 45 minutes
Total time spent on project so far : 12 hours
Total project cost so far : $12.64 USD
For some other tips on removing the canvas and paint from a steam trunk, click on the paint removal and canvas removal tags at the bottom of the post.
Wednesday, November 16, 2011
Removing Trunk Canvas And Hideous Pink Paint
Started removing the trunk canvas and the hideous pink paint today. I didn't have anyone to take pictures so I will post step by step instructions and the pictures in the next post. Honestly, I really didn't expect this part of the restoration to be so difficult. I spent a little over an hour on this today and didn't even complete one panel. This is going to be a lot of work.
The darker parts of the trunk panel is the leftover canvas that still has to be removed. This thing is going to look so much better once the natural wood is exposed.
While stripping the canvas you have to be very careful not to gouge the wood. This part of the project is going to be very time consuming. Anyway, I just wanted to post an update. I'll make sure to post instructions and pictures in the next post.
Project time for this post : 1 hour 15 minutes
Total time spent on project so far : 10 hours 15 minutes
Total project cost so far : $11.64 USD
 | ||||||
| Rear trunk panel with all the canvas and hideous pink paint almost removed. This is 1 hour and 15 minutes of work. |
 |
| Small wood gouge in the rear trunk panel. This is why this part of the project is so time consuming. You have to make sure the razor knife or scraper doesn't get away from you. You'll know you are gouging the wood when the bottom of the canvas scraping has a small layer of wood still attached to it. I placed the shaving next to the gouge mark to show you what this looks like. |
While stripping the canvas you have to be very careful not to gouge the wood. This part of the project is going to be very time consuming. Anyway, I just wanted to post an update. I'll make sure to post instructions and pictures in the next post.
Project time for this post : 1 hour 15 minutes
Total time spent on project so far : 10 hours 15 minutes
Total project cost so far : $11.64 USD
Subscribe to:
Posts (Atom)