I got most of the paint and canvas off the steam trunk with the paint scraper, this will help make it a little bit easier when it comes time to sand our project. In order to avoid gouging the wood with the paint scraper I left the really stubborn canvas and paint to be sanded off later.
I'm not going to go into great detail here. Sanding wood really isn't rocket science. Simply roll up your sleeves and start sanding. The biggest tip I can give you is to always try and sand with the grain of the wood. This really is the most important part, SAND WITH THE GRAIN OF THE WOOD! Bold,capital letters, italics, exclamation mark ! If you sand against the grain, you will see the scratches when you try and stain your finished product. Tip number 2 , use a sanding block whenever possible. This gives you a nice even sanded surface and will help avoid putting grooves or waves in the finished product.
With that said, this is how I attacked this part of the project.
I purchased a sanding sponge from the hardware store. I went with a coarse grade sponge. I used the course sponge to get the areas that had a lot of leftover canvas, paint, and glue. Once the sponge lost its coarseness I wrapped it with a medium grade sandpaper and used the sponge as my sanding block.You could also get a small block of wood and use that instead of the sanding sponge.
Now sand the entire trunk down with the medium grade sand paper wrapped around the sanding sponge. Take off all the leftover canvas, paint and glue. Along the edges and by the locking mechanisms, and latches is the only place I went against the grain when needed. Sand as close to the mechanisms as possible, and when the canvas, glue and paint is removed then take your time and sand with the grain to remove any cross scratching you may have created. This is the most important part, anytime you sand against the grain, sand equally with the grain to remove the scratching.
Finally, before you stain the trunk, you want to sand the entire trunk again with a fine sand paper, and then repeat the entire process again with an extra fine sandpaper. Paying special attention to any areas you may have sanded against the grain and any gouges that may have been created by the paint scraper.
Take your time, be patient, and the extra effort should be rewarding in the finished product.
I spent an additional $9.98 on sanding sponge and sand paper. I'm sure I will be buying more sand paper in the near future. I was short on cash the day I purchased this stuff, so I only bought what I absolutely needed. I still have to buy the fine and extra fine sand paper for finishing. I spent an additional 3.5 hours sanding the front, and will be sanding away throughout the week to try and finish this part of the project up.
Project time for this post : 3 hours 30 minutes
Total time spent on project so far : 19 hours 45 minutes
Total project cost so far : $22.62 USD
Showing posts with label prep. Show all posts
Showing posts with label prep. Show all posts
Wednesday, December 14, 2011
Monday, November 21, 2011
Stripping The Trunk Canvas
Finally, it's time to remove that hideous pink painted canvas. I started this the other day but didn't have anyone to take pictures, so today I will post a description of how to go about removing the canvas from your trunk restore project.
First I took a razor knife and ran it around the edges of each panel. I tried to slide the razor knife under the trim of the steam trunk without cutting into the trim itself. I used a cheap razor knife I purchased from the dollar store and it seemed to work fine. You could probably use a sharp knife for this but I like the flex of the razor knife. Being flexible, it helped to get into the tight spaces. When using a razor knife try to make sure your other hand is behind the blade, and try to cut away from you so you don't have an accident. Unlike the picture below, I like to live dangerously. I suppose once I take a trip to the emergency room that will cure me of this nasty habit.
After you run the razor knife around the edges of the steam trunk, take a paint scraper and start pulling up the canvas from the trunk. Some of it will come off very easily, other pieces will be much more difficult. Try not to gouge the wood while you do this, and always try and scrape with the grain of the wood.
The bottom panel came up pretty easily but it looks like there may have been some water damage at one time. This helped to loosen the ugly pink painted canvas. The center panel of the trunk was a little more difficult to remove.
I took a larger putty knife and tried to scrape off the more stubborn canvas. I plan on stripping most of the canvas off with the putty knife, the little bit that's left I'll try and remove with a fine sand paper. When I get to that point I'll post the pictures and add them to this tutorial.
This is how far I got after 1 hour and 45 minutes of scrapping. I'll be doing this throughout the week and post some pix of the end result when the paint and canvas are completely removed.
I'll add the 1 hour 45 minutes it took to do this to the overall project time and also add 1 dollar to the project cost for the razor knife I purchased. I now have 12 hours and 12 dollars and some change invested into this project.
Project time for this post : 1 hour 45 minutes
Total time spent on project so far : 12 hours
Total project cost so far : $12.64 USD
For some other tips on removing the canvas and paint from a steam trunk, click on the paint removal and canvas removal tags at the bottom of the post.
First I took a razor knife and ran it around the edges of each panel. I tried to slide the razor knife under the trim of the steam trunk without cutting into the trim itself. I used a cheap razor knife I purchased from the dollar store and it seemed to work fine. You could probably use a sharp knife for this but I like the flex of the razor knife. Being flexible, it helped to get into the tight spaces. When using a razor knife try to make sure your other hand is behind the blade, and try to cut away from you so you don't have an accident. Unlike the picture below, I like to live dangerously. I suppose once I take a trip to the emergency room that will cure me of this nasty habit.
 | |||||||
| Slide the razor knife under the edges of the trunk trim. |
 |
| Try to lift the edges of the canvas and loosen it up a bit. |
 |
| Going with the grain of the wood start removing the canvas. |
The bottom panel came up pretty easily but it looks like there may have been some water damage at one time. This helped to loosen the ugly pink painted canvas. The center panel of the trunk was a little more difficult to remove.
 |
| Take a putty knife or paint scraper to the more stubborn parts. Remember to scrape with the grain of the wood, and try be extra careful not to gouge the wood with your scraper |
I took a larger putty knife and tried to scrape off the more stubborn canvas. I plan on stripping most of the canvas off with the putty knife, the little bit that's left I'll try and remove with a fine sand paper. When I get to that point I'll post the pictures and add them to this tutorial.
 |
| This is how far I got after 1 hour and 45 minutes. I did get all the bottom panels all the way around. |
I'll add the 1 hour 45 minutes it took to do this to the overall project time and also add 1 dollar to the project cost for the razor knife I purchased. I now have 12 hours and 12 dollars and some change invested into this project.
Project time for this post : 1 hour 45 minutes
Total time spent on project so far : 12 hours
Total project cost so far : $12.64 USD
For some other tips on removing the canvas and paint from a steam trunk, click on the paint removal and canvas removal tags at the bottom of the post.
Wednesday, November 16, 2011
Removing Trunk Canvas And Hideous Pink Paint
Started removing the trunk canvas and the hideous pink paint today. I didn't have anyone to take pictures so I will post step by step instructions and the pictures in the next post. Honestly, I really didn't expect this part of the restoration to be so difficult. I spent a little over an hour on this today and didn't even complete one panel. This is going to be a lot of work.
The darker parts of the trunk panel is the leftover canvas that still has to be removed. This thing is going to look so much better once the natural wood is exposed.
While stripping the canvas you have to be very careful not to gouge the wood. This part of the project is going to be very time consuming. Anyway, I just wanted to post an update. I'll make sure to post instructions and pictures in the next post.
Project time for this post : 1 hour 15 minutes
Total time spent on project so far : 10 hours 15 minutes
Total project cost so far : $11.64 USD
 | ||||||
| Rear trunk panel with all the canvas and hideous pink paint almost removed. This is 1 hour and 15 minutes of work. |
 |
| Small wood gouge in the rear trunk panel. This is why this part of the project is so time consuming. You have to make sure the razor knife or scraper doesn't get away from you. You'll know you are gouging the wood when the bottom of the canvas scraping has a small layer of wood still attached to it. I placed the shaving next to the gouge mark to show you what this looks like. |
While stripping the canvas you have to be very careful not to gouge the wood. This part of the project is going to be very time consuming. Anyway, I just wanted to post an update. I'll make sure to post instructions and pictures in the next post.
Project time for this post : 1 hour 15 minutes
Total time spent on project so far : 10 hours 15 minutes
Total project cost so far : $11.64 USD
Monday, November 14, 2011
Polishing Brass Work Completed
The brass work on the trunk is pretty much completed. I say pretty much because I probably could of spent another 8 hours on this and still wouldn't be completely satisfied. However, for the most part I think it came out pretty good. I spent an additional 6.5 hours on completing the brass work. This was accomplished in 4 polishing sessions throughout the week.There is no way I could sit there for 6.5 hours straight doing this.
What I thought was brass appears to be brass plated metal on many of the parts. The steel wool did take some of the brass finish off some of the parts.I really don't think there was any way around losing some of the brass finish as the parts were heavily corroded. However the parts now have a shiny, rustic, antique look to them which just adds to the rustic charm of the trunk. I think I'm going to keep this look. I could paint them, or buy some cruddy brush on brass look garbage at the craft store but I think that will take away from the rustic and original look I'm trying to achieve.
The final technique I came up with for polishing the brass was to rub it out with a number 4 coarse steel wool with a dime size drop of brass cleaner on it. After I did all the parts with the number 4 steel wool, I then redid them with a number 0 fine steel wool. When I used the number 0 steel wool I didn't add any brass cleaner and this really got the pieces shining again and added a nice luster to all the parts. They still have some nice antiquing and overall I am very happy with the end result. You can see some before and after pictures in the original post on this subject. Click here for original post.
I have to replace the handles, and the trunk straps, so knowing that I will be removing the fasteners for these parts I didn't spend a lot of time on them. I figure when I take them off, I will buff them out on a machine. These pieces are in really bad shape anyway , I will include some pictures of the trunk parts I remove and how I remove them in another post.
I plan on removing the ugly pink painted canvas this week. I can't wait to get rid of that God forsaken color. I know this trunk is going to look so much better once it's stripped down to its natural wood. I'll post those pictures in the next couple days.
As I posted earlier, I think this is gonna become more of a refurbish job than a restore.This trunk has been severely damaged over the years. The more I work on this thing, the more cracks and blemishes I find in it.
Project time for this post : 6.5 hours
Total time spent on project so far : 9 hours
Total project cost so far : $11.64 USD
 |
| This is me polishing the trunk brass. |
What I thought was brass appears to be brass plated metal on many of the parts. The steel wool did take some of the brass finish off some of the parts.I really don't think there was any way around losing some of the brass finish as the parts were heavily corroded. However the parts now have a shiny, rustic, antique look to them which just adds to the rustic charm of the trunk. I think I'm going to keep this look. I could paint them, or buy some cruddy brush on brass look garbage at the craft store but I think that will take away from the rustic and original look I'm trying to achieve.
The final technique I came up with for polishing the brass was to rub it out with a number 4 coarse steel wool with a dime size drop of brass cleaner on it. After I did all the parts with the number 4 steel wool, I then redid them with a number 0 fine steel wool. When I used the number 0 steel wool I didn't add any brass cleaner and this really got the pieces shining again and added a nice luster to all the parts. They still have some nice antiquing and overall I am very happy with the end result. You can see some before and after pictures in the original post on this subject. Click here for original post.
I have to replace the handles, and the trunk straps, so knowing that I will be removing the fasteners for these parts I didn't spend a lot of time on them. I figure when I take them off, I will buff them out on a machine. These pieces are in really bad shape anyway , I will include some pictures of the trunk parts I remove and how I remove them in another post.
I plan on removing the ugly pink painted canvas this week. I can't wait to get rid of that God forsaken color. I know this trunk is going to look so much better once it's stripped down to its natural wood. I'll post those pictures in the next couple days.
As I posted earlier, I think this is gonna become more of a refurbish job than a restore.This trunk has been severely damaged over the years. The more I work on this thing, the more cracks and blemishes I find in it.
Project time for this post : 6.5 hours
Total time spent on project so far : 9 hours
Total project cost so far : $11.64 USD
Sunday, November 6, 2011
Polishing Trunk Brass And Metal Parts
This has to be the most mundane, monotonous, boring task I have ever undertook ! I now have two things I hate in life, cleaning dishes and cleaning brass. So I have some good news and some bad news. The good news is everyone seems to want brass work on their trunk and that appears to be what I have. The bad news is cleaning extremely corroded, and tarnished brass absolutely sucks for lack of a better word.
So I got about ten minutes and a quarter beer into the project and realized the steel wool I purchased was too fine. I got a zero grade steel wool and that just wasn't cutting through the tarnish, grime and corrosion. I stopped what I was doing, went down to the hardware store and finally spent some money. I purchased some dust masks $2.97, Brasso brass cleaner $3.49, some number 4 steel wool $2.59, and some number 0 steel wool $2.59.
I returned home, selected some music that would motivate me, some upbeat funky breaks and began attacking the brass work with a ferocious attitude. The process I found most successful was to apply a dime size dollop of brass cleaner to the number 4 steel wool and then rub the heck out of the part. I tried to be as careful as possible not to get the brass cleaner on the leather trim, and ugly pink painted canvas. For this reason I'm glad I decided not to remove it and expose the natural wood. I then took a piece of number 0 steel wool and removed the coarseness of the number 4 steel wool.It's hard to tell from the pictures but it really made a huge difference.
I did this for two and a half hours and although I began to see some results there is still a lot of work to be done. The following are some before and after pictures. Chances are I'm not going to end up with a highly polished mirrored finish on most of these parts, but they will look much better when they are finished. The cleaning did leave some dark discoloration on the canvas which would of ended up on the wood had I not left the canvas in place. Now when I do remove the canvas from the steam trunk I should have some fairly clean natural wood to work with.
I was tempted to buy a stripping attachment for a power drill when I was at the hardware store, but was advised against that.The technique that I've described in this post will help protect the wood and leather that the brass parts are attached to. I do have some skills using a Dremel Tool so I may invest in one to put a nice finish on these parts.
You might be wondering why I just didn't remove all the parts from the trunk and then refinish them ? I would strongly discourage this. You have to realize most of these steam trunks are over 100 years old. The less parts you remove the less chance you have of breaking something. The less you bang on these things the better. The goal here is to improve the appearance of the steam trunk and do as little damage as possible. Not to mention if your trying to do a proper restore you want to change as little as possible.
I plan on doing this all week for a couple hours a day. I should be able to get most of the corrosion and dirt off these parts and return them close to there original luster. In the mean time I'll post some information about the trunk, try to find some trunk history on the Henry Likly Steam Trunk Company, and maybe a little information about me. Thanks for stopping by My Old Steam Trunk and I hope you found this post helpful.
Project time for this post 2 hours 30 minutes.
Total time so far 3 hours 45 minutes.
Cost spent on this post : $11.64
Total project cost so far : $11.64
So I got about ten minutes and a quarter beer into the project and realized the steel wool I purchased was too fine. I got a zero grade steel wool and that just wasn't cutting through the tarnish, grime and corrosion. I stopped what I was doing, went down to the hardware store and finally spent some money. I purchased some dust masks $2.97, Brasso brass cleaner $3.49, some number 4 steel wool $2.59, and some number 0 steel wool $2.59.
 |
| What I used to clean the brass work on the steam trunk. |
I did this for two and a half hours and although I began to see some results there is still a lot of work to be done. The following are some before and after pictures. Chances are I'm not going to end up with a highly polished mirrored finish on most of these parts, but they will look much better when they are finished. The cleaning did leave some dark discoloration on the canvas which would of ended up on the wood had I not left the canvas in place. Now when I do remove the canvas from the steam trunk I should have some fairly clean natural wood to work with.
 |
| It's tough to get a good picture of the change, but I assure you it is a dramatic difference. |
 | |
| This piece came out the best. I can't believe what a difference this made. |
I was tempted to buy a stripping attachment for a power drill when I was at the hardware store, but was advised against that.The technique that I've described in this post will help protect the wood and leather that the brass parts are attached to. I do have some skills using a Dremel Tool so I may invest in one to put a nice finish on these parts.
You might be wondering why I just didn't remove all the parts from the trunk and then refinish them ? I would strongly discourage this. You have to realize most of these steam trunks are over 100 years old. The less parts you remove the less chance you have of breaking something. The less you bang on these things the better. The goal here is to improve the appearance of the steam trunk and do as little damage as possible. Not to mention if your trying to do a proper restore you want to change as little as possible.
I plan on doing this all week for a couple hours a day. I should be able to get most of the corrosion and dirt off these parts and return them close to there original luster. In the mean time I'll post some information about the trunk, try to find some trunk history on the Henry Likly Steam Trunk Company, and maybe a little information about me. Thanks for stopping by My Old Steam Trunk and I hope you found this post helpful.
Project time for this post 2 hours 30 minutes.
Total time so far 3 hours 45 minutes.
Cost spent on this post : $11.64
Total project cost so far : $11.64
Saturday, November 5, 2011
First Some Brass Work
I started removing the ugly pink paint the other night. If you haven't realized yet I'm very excited about getting rid of this hideous color. I know once that ugly pink paint is removed , and the natural wood underneath is revealed, this thing is going to look soooo much better.

As I started stripping the ugly pink paint from the bottom rear panel, I noticed how bad the corner brackets and other metal parts had corroded with time. Now the ugly pink paint was applied over the original canvas on the outside of the trunk. Sad that someone did that, however the good news is that the natural wood underneath is protected by the ugly pink painted canvas. I then thought why would I remove all the ugly pink painted canvas and leave the natural wood exposed while I clean and polish the metal pieces. So after removing the paint covered canvas from the bottom panel the other night I decided to leave the rest and clean and polish the metal work on the trunk today. When I return to removing the paint from the rest of the trunk I will post how I did it with instructions.
I did discover a small crack on the bottom rear panel after removing the canvas. I'll have to figure out what to do about that later. Any suggestions ?
I ran to the store this afternoon, got a couple frozen pizzas for when I get hungry, gulped down an energy drink, got a 12 pack of some decent beer, and plan on polishing and steel wooling the heck out of the brass work and other metal pieces on the trunk. I'll post the details of how I did that and the results in my next blog post.

It only took about 15 minutes to remove the ugly pink painted canvas from the bottom rear panel of the trunk so I'll add that to the project time now. This gives a work hour total of 1 hour and 15 minutes so far. Zero dollars invested.
Thursday, November 3, 2011
Clear Some Space !
Before I remove the ugly pink paint, I think I should clear out a work space. While I was cleaning the leather trim I had the trunk on the floor and I realised that I was going to be bending down a lot for this project. I figured I should get the trunk up on something so my lazy butt isn't bending over every 5 minutes. The old spinal cord isn't what it used to be ! This trunk obviously needs a lot of work, I plan on putting in many hours, so I may as well get comfortable.

I reorganized this disaster of a mess, moved the hunting equipment that nobody uses any more onto an old folding table, and cleared off this old work bench which is actually a toy workbench from when I was a child. It is solid wood, has a little shelf underneath it for tools and various doodads and whatnots but it was a bit wobbly. I tightened up the screws, got the wobble out of it and placed the steam trunk on top of it. PERFECTO ! It seems to be the perfect height. This should make life a bit easier !
Suggestion: If your planning on restoring one of these old steam trunks, clear out a nice work space for yourself. Make sure you have plenty of light so you can see what you're doing. Get yourself comfortable, find a place to get your tools organized, make sure the trunk sits at a comfortable height and get ready for some work !
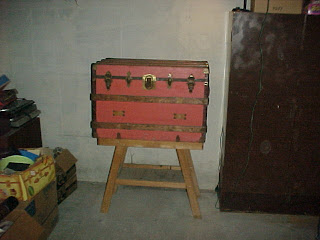
Cost And Time : I'm adding this to project time. It took about 30 minutes making the project time total 1 hour. Cost for a clean, organized workspace 0 dollars but absolutely priceless. Making the total investment in this project 0 bucks. So far I'm getting off pretty cheap Don't worry I suspect I'll be shelling out some cash soon.
Subscribe to:
Posts (Atom)